Are you a theme designer or developer looking to expand the capabilities of your WordPress site? A custom field is a WordPress feature created for use by various themes or plugins to store additional information related to posts. A good description of custom fields is SEO metadata that will come in handy as input fields for writing your post. So with this ability of WordPress, you can add custom fields or metadata which is extra/bits of arbitrary information for any post. However, with custom fields, you can do more advanced things like set an expiration date for your message, but this requires knowledge of coding. Then let’s take a detailed look at what custom fields are,
What are custom fields in WordPress?
Custom fields are features in WordPress that allow you to add additional information when writing a post, and they are also known as post metadata. Because WordPress stores this information as metadata, you can display it using the template tags of your WordPress site theme. Examples of these custom fields range from adding a rating to a product you’re viewing, from a piece of music to a written message, and more that’s available or you might consider including.
- By default, custom fields are not available (i.e., hidden) on your site’s post editor screen.
- To make it visible in the classic editor, you need to activate the custom field field in the Screen Options button in the post/page admin panel of your WordPress site. Similarly, you can enable it in the Settings section of the Gutenberg editor.
Custom fields format
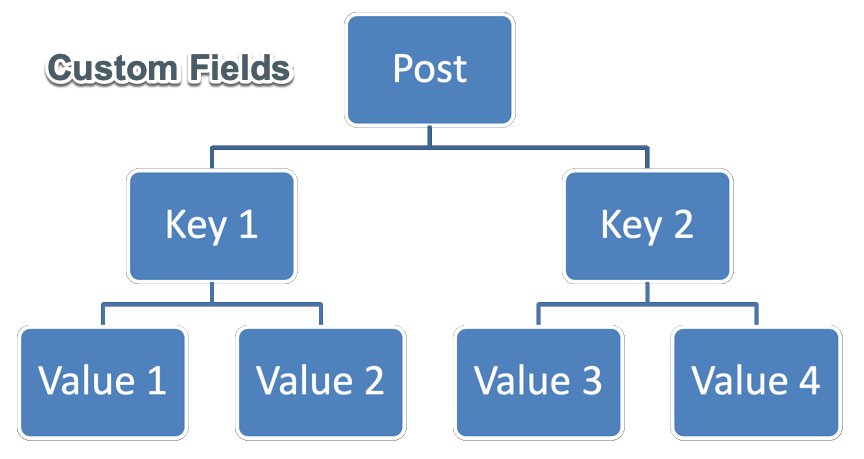
Thus, custom field metadata is paired with “names or keys” and “values”, where the key is the name of the metadata element and the value is the unique information that will form the description associated with the individual post.
“Keys” differ from “Values” in regards to custom fields, and this is that a Key can be used more than once in a message, but its values are different. For example, you want to express that you watch a comic book and a horror movie (two separate)? Create “now viewing” as a key and use it twice in the same post with the values ”horror” and “comic”, which is the perfect way to present custom fields on your WordPress site.
Use custom fields in WordPress
To create or use a custom field, you must define it. We would add a WordPress custom field named “currently being read” to the site’s post and display it at the bottom of the content. So, once you create this key, you can assign a value to each message. Here are the steps to take for this using the following illustrations.
Enable custom fields in the editor
Log in to your WordPress site’s dashboard and open the post or page where you want to add custom fields. As shown in the edit screen, the custom field option is not shown by default (that is, if it has not been activated before).
- Using the Gutenberg block editor, find and click on the three dots in the top right corner.
- Click on the “Settings” option, select the “Panel” section.
- In the Advanced category, check the box next to Custom Fields to enable it.
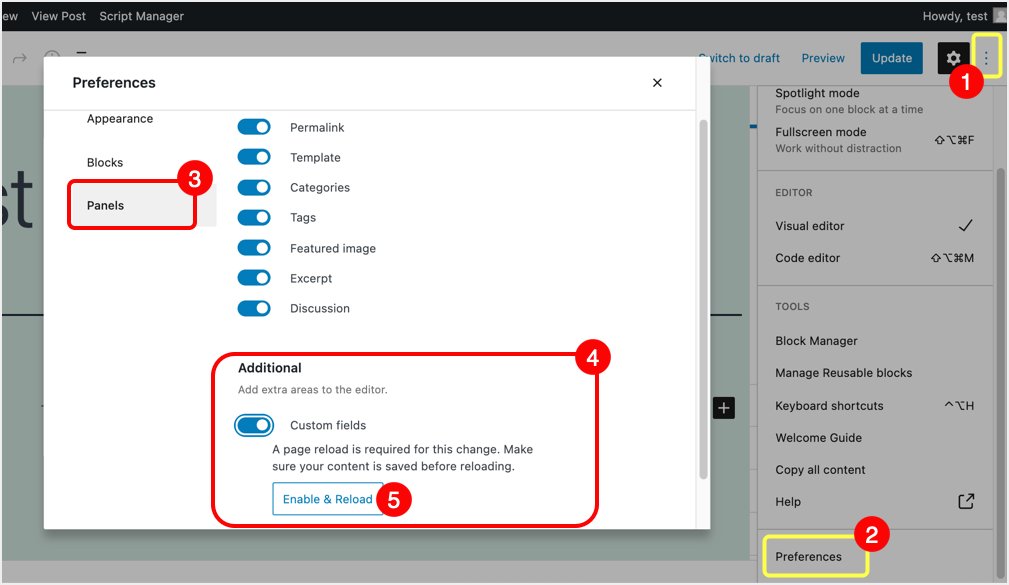
- After that, you will need to click the Power on and Restart button for the changes to take effect.
- Once the page navigation is complete, the Custom Fields menus will appear below your post on the screen/page.
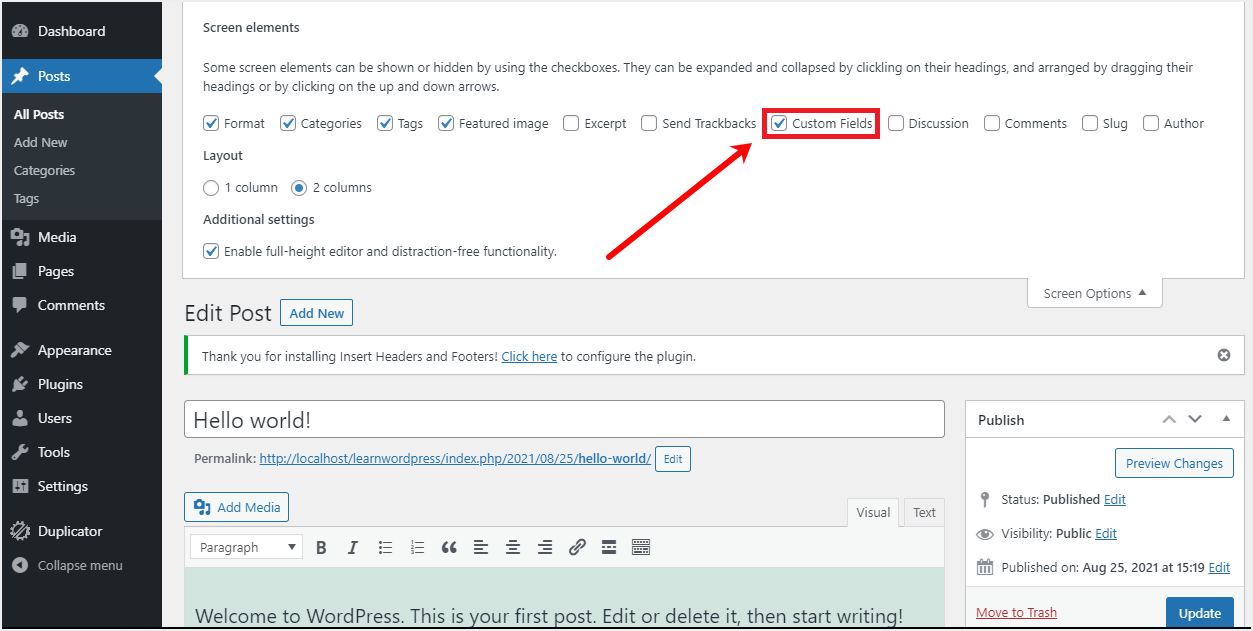
- If you’re using the old classic editor, click the “Screen Options” button in the top right corner of the editor and check the box next to “custom fields” to enable it.
- Alternatively, you can follow the more technical path to display any hidden custom field using the functions.php file. Go to select the “functions.php” file by clicking on the “Theme Editor” tab in the “Appearance” menu in your WordPress site’s dashboard, and paste in the following codes:
add_action( 'admin_head', 'showhiddencustomfields' );
function showhiddencustomfields() {
    echo "<style type="text/css">#postcustom .hidden { display: table-row; }</style>
";
}
- In the editor it should look like this:
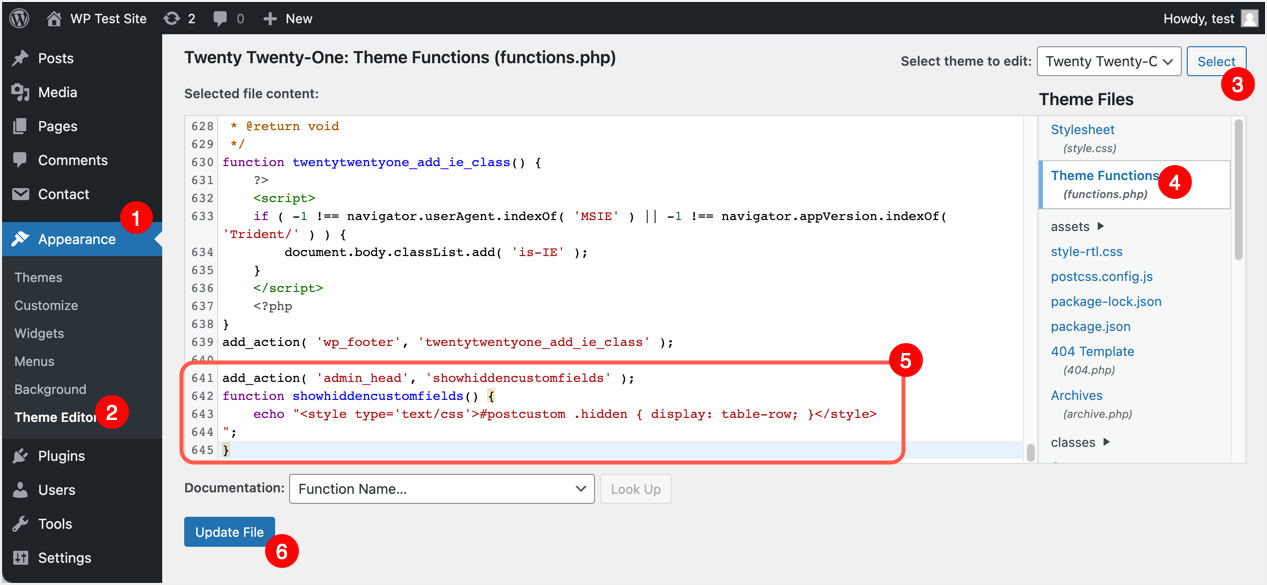
- Then click “Update File” to save your changes.
- Keep in mind that this code trick is theme-specific, so updating, updating, or changing the theme will require you to repeat the above steps to keep your site functional. Well, you can save these codes as a PHP file and download them as a plugin, install and activate them so you don’t have to worry about frequent updates. Alternatively, you can use plugins like Code Snippet to manage new features in an organized way.
Adding custom fields to messages
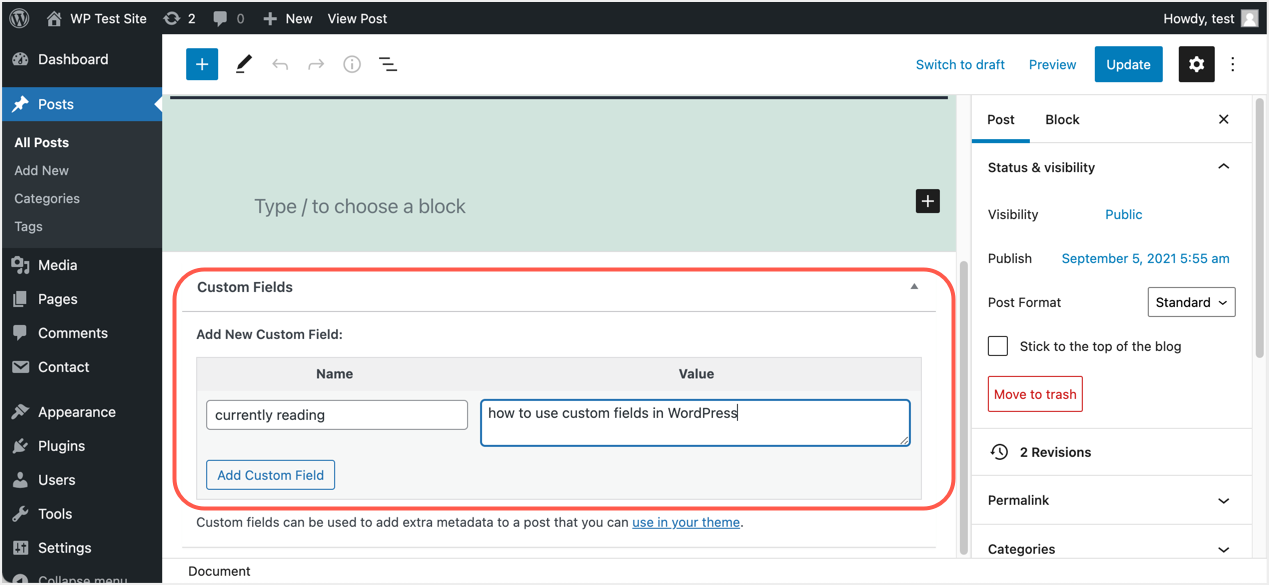
After enabling the custom fields meta box, scroll down to the “Custom Fields” area below your written message or page content. Then enter the field we chose “currently being read” as the name/key with “how to use custom fields in WordPress” as the value of what you are reading, and it should all be without quotes. Finally, click the Add Custom Field button.
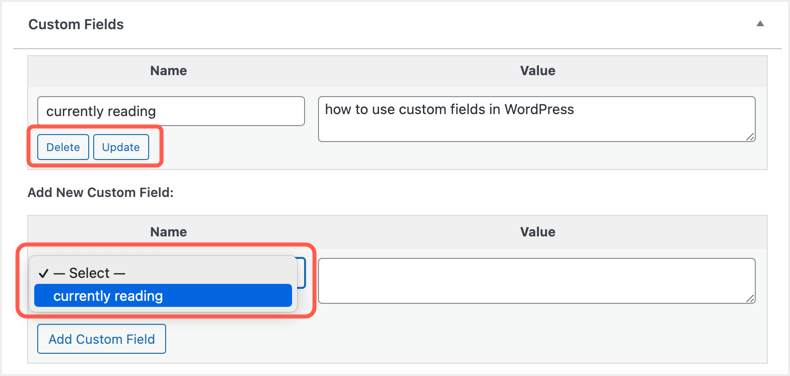
After adding a field, you can edit or delete the entry at any time and post an updated post. Alternatively, you can select any previously added custom field from the drop-down list and assign a new value to it.
After creating the custom field, click the Publish button and make your post live.
Displaying Custom Fields in WordPress
Now that the custom field is just in the backend and you have to use the code snippet to demonstrate it in the front end. You will have to edit the WordPress theme file to display the custom fields. To go to a single post, you need to edit the “single.php” or “content-single.php” file, but first find the following lines of code in the file:
while ( have_posts() ) : the_post();
.
.
endwhile; // end of the loop.
You must add the code for your custom fields below this code block.
echo get_post_meta($post->ID, 'key', true);Don’t forget to change “key” to the one you used in the post, as here our key name in the illustration above is “currently being read”. You can also add any prefix that looks like “You’re reading:” and the code should look like this:
echo '<p>You are currently reading:</p>', get_post_meta($post->ID, 'currently reading', true);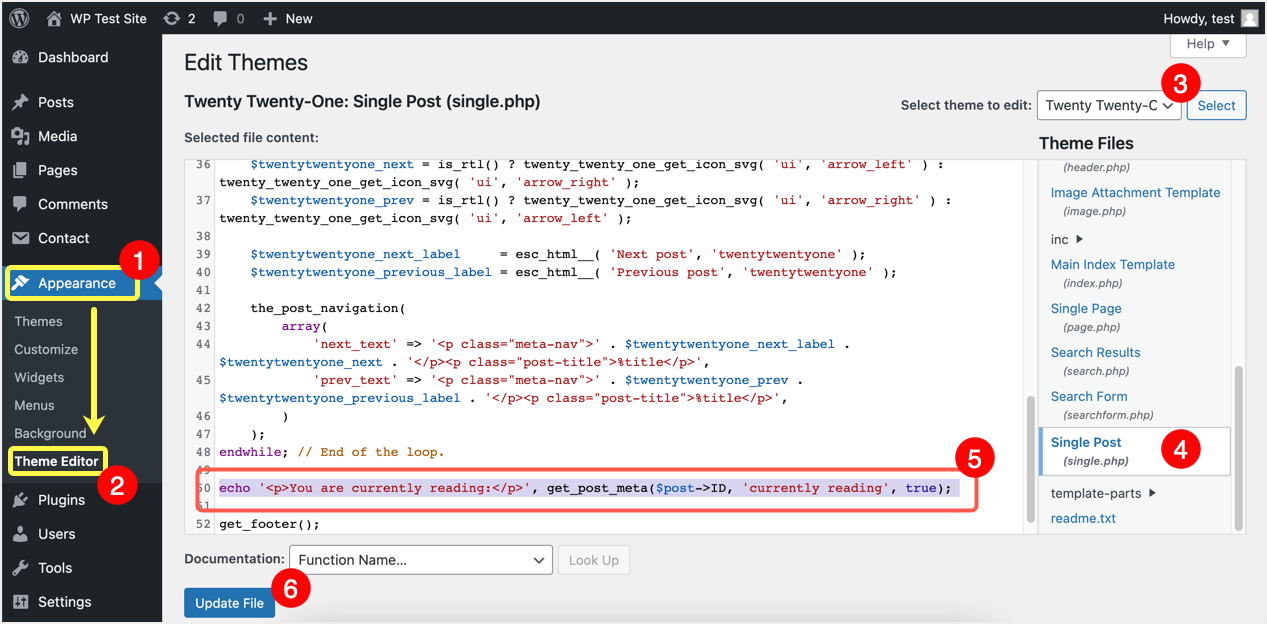
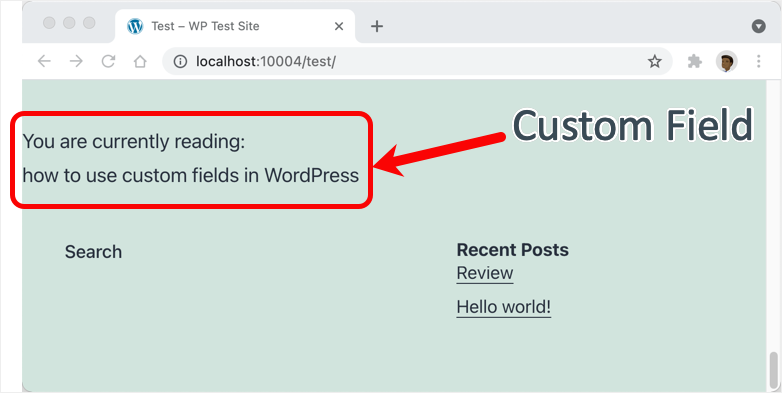
Finally, save your changes by clicking “Update File” and review the post where the custom fields were included to see the result.
You can use CSS to adjust the position and display alignment of your custom fields in the site layout.
Using the Advanced Custom Fields Plugin
While it’s easier to manually create custom fields, it’s difficult for regular users to code and display them in a usable way. To avoid the hassle, you can use plugins like Advanced Custom Fields and manage the following:
- Use over 30 field types to quickly create your custom fields.
- Create field groups and define placement rules.
- Add custom fields to taxonomy, media, comments, and anywhere else on your site.
- Use the built-in functions to display the required fields.
- Use extensions to improve plugin features
A Practical Example of Using Custom Fields in WordPress
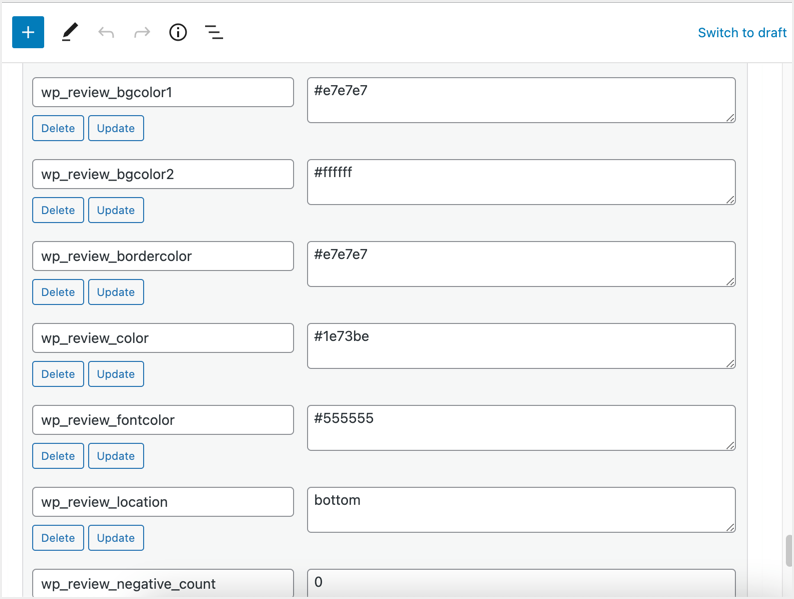
We can show you many practical examples of using custom fields in the WordPress editor. Yoast SEO is one of the best examples of adding custom data for SEO purposes. Another example includes WP Review, WP Rocket and WP Coupons. Also, almost all commercial themes rely heavily on custom fields. For example, lightweight themes like GeneratePress and Astra offer custom fields to customize the layout for specific posts.
Things to remember when using custom fields
As you can see, creating and using custom fields in WordPress is a simple task without being an expert in coding. SEO, reviews, coupons, and many other types of plugins use these custom fields to add additional post meta information. However, this comes at a cost and you should be aware of this fact.
- WordPress stores all of these custom fields in the wp_postmeta table. While the post content itself is stored in another wp_post table, wp_postmeta is one of the largest tables in any standard WordPress installation due to the large number of metadata fields.
- While you can remove custom fields from the post editor meta field, it will not remove the original field. It will only remove the instance used in that post and you will see that the same field is available in the same or different post. Therefore completely removing a custom field is a complex task and you will probably need to use a SQL query in phpMyAdmin or a similar tool to edit your database directly.
- Any unused custom fields will always be available in the postmeta table occupying the database storage. Let’s take an example that you have a review plugin that uses 10 custom fields with pre-populated values from the plugin’s global settings page. This may look good since you can use the default values and only edit them if necessary. With this idea, you’ve created 20 review posts on your site with default meta fields and have 80 more posts that don’t have reviews. When you check the postmeta table, you will be surprised that all 100 posts will have 10 custom field entries with pre-populated values. This means there will be 800 duplicate entries (80 * 10) without any usage.
- The problem gets worse if you disable the plugin and want to use a different review plugin. The table will now have 1000 (100 * 10) duplicate entries with no use. The table will grow with tens of thousands of entries if you have multiple plugins with lots of custom fields like Yoast SEO, WP Review, WP Coupons, etc.)
- Too many meta blocks will also slow down your post editor, that’s from a backend perspective.
With this warning in mind, make sure you use custom fields wisely and only when necessary. Don’t create or use a field that’s only needed for a few posts. Instead, you can create your own post type for this purpose, which you can later convert to a regular post.
Final Thoughts
There’s still a lot to talk about with custom fields as they get more technical as we go along. But with this fairly simple guide, you’ll be well on your way to getting started with the basics of using custom fields on your WordPress site.