WP Rocket is one of the most popular caching plugins available for WordPress. It broke the traditional rule of having hundreds of options and offers a simple, user-friendly interface for users. You can simply switch options to speed up your site in a few minutes. However, the plugin does not offer any options in the frontend to disable page caching or bypass the setting for certain pages. In this article, we will explain how to bypass WP Rocket caching in WordPress using various methods.
Bypass WP Rocket caching
While caching helps users load pages quickly, it can create problems when performing certain actions. The following are some of the common scenarios where you can bypass WP Rocket caching:
- You want to check page speed score in Google PageSpeed Insights tool with and without WP Rocket plugin. You can also find out how many CSS or JS files are loaded without caching, or do a similar analysis.
- Just want to disable WP Rocket caching on certain pages. For example, WP Rocket won’t work with WooCommerce and GeneratePress themes and make store pages inactive. You need to disable WooCommerce styles on small screen to fix this issue.
- You want to disable page level caching which is done automatically with WP Rocket without any option to turn it off in the front end.
Depending on the situation, you can use one of the following options to bypass WP Rocket caching. In most cases, you may want to disable the plugin at the site or page level instead of bypassing it. Therefore, we will explain the available options for disabling, as well as bypassing without deactivation.
1. Completely disable the plugin
The simplest and easiest option is to simply disable the plugin on your site. You can complete testing and then activate again. The good thing is that the plugin will keep all your previous settings. However, completely disabling a plugin every time you want to test something simple is unrealistic.
Remember that you must deactivate the plugin if you want to check compatibility or if you want to test another caching plugin. For example, if you want to test W3 Total Cache, first disable WP Rocket before installing the W3 Total Cache plugin. These caching plugins will add plugin files such as advanced-cache.php which may conflict with each other when both plugins are active. As a result, your site will display a white screen of death or caching will not work.
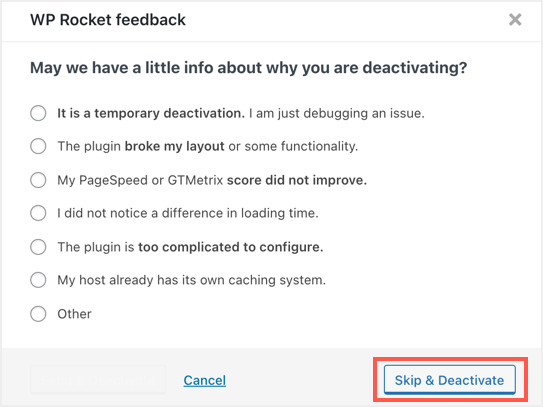
Go to the “Plugins” section in your WordPress admin panel and click on the “Deactivate” link under the WP Rocket plugin. Click the “Ignore and Deactivate” button to temporarily deactivate the plugin without deleting the cached content.
2. Disable the plugin on certain pages.
Most commercial WordPress themes offer page builder integrations such as Elementor and Visual Composer. Caching will have real problems when using heavy JavaScript on your pages with page builder plugins. Elements like dynamically animated charts and jQuery data tables may not work properly with aggressive caching plugins like WP Rocket. The best solution is to disable WP Rocket caching on pages where you have caching issues.
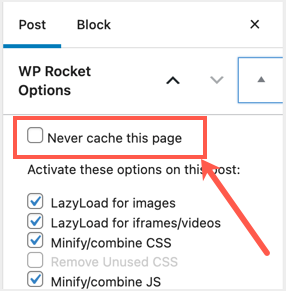
- Go to Posts or Pages, find your article and edit it in the Gutenberg editor.
- WP Rocket will add a meta box to the editor that you can use to change the global behavior. If you don’t see the meta box in the sidebar, click the three-dot button and select Settings. Go to the “Panels” section and enable the “WP Rocket Options” meta field.

- Once you see the meta box in the sidebar, check the “Never cache this page” box.
- Publish your article and the plugin will ignore the page for all types of caching.
You can also follow the same procedure for any other custom post types on your site.
3. Clear cache for specific pages
Similar to page exclusion, you can also just delete the cache on specific pages. By default, WP Rocket clears the cache whenever you change page content and publish again. However, clearing may not work in some cases, such as when you change a category from a post index page, or change content outside of the editor using third-party tools. In any case, we recommend that you clear the cache for that particular page before you share the URL or submit it to Google Search Console.
- Go to the Posts section and find the page where you want to delete the old cache.
- Hover over the header link and click “Clear this cache”.
- This will clear the old cache and WP Rocket will cache the new content when you visit the page again.

4. Exclude pages from caching.
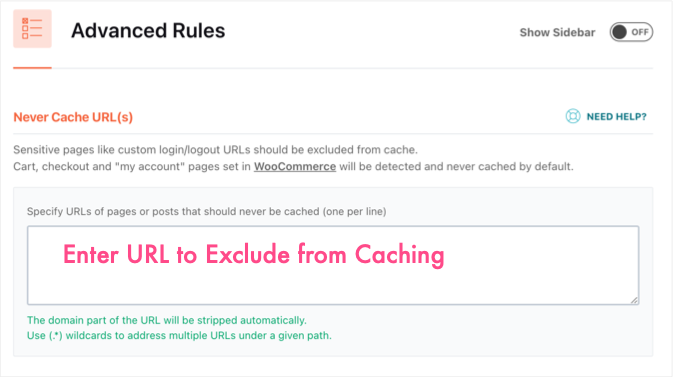
If you don’t want to exclude pages by going to the editor, you can also exclude them from the plugin settings. The advantage of using settings is that you can use various options such as a regular expression or restrict certain user agents from accessing cached pages. You can ignore page caching by going to Settings > WP Rocket and going to the Advanced Rules section.
On the same settings page, you can add user agents under “Never cache user agents”.
5. Bypass WP Rocket cache without deactivation
Sometimes you want to test multiple pages without deactivating the cache and bypassing the plugin.
- Just add ? nowprocket with the URL of the page for which you want to test access to a non-cached page, bypassing WP Rocket caching.
- For example, if your page’s URL is ” https://yoursite.com/my-page/ “ Then use a URL like ” https://yoursite.com/my-page?nowprocket ” to access the page’s uncached content.
This is the best way to test your page speed by bypassing WP Rocket caching and doing compatibility testing. However, this will not bypass caching rules applied via the htaccess file. For example, WP Rocket will use htaccess directives for browser caching and GZIP compression, which might still work when bypassed with ? nowprocket request.
6. Disable caching at the page level.
The final option is to permanently disable page-level caching on the entire site or on specific pages. This is not recommended as page caching is important for speed. However, you may need this in some cases where you have another page caching plugin that conflicts with your WP Rocket setup. For example, SiteGround offers automatic static caching (plus browser caching and GZIP compression) with the ability to deliver Nginx directly from the hosting account. We have confirmed with WP Rocket support that installing WP Rocket on SiteGround works without any conflicts.
However, this may not work for all custom caching settings and the solution is to disable page caching from WP Rocket as you cannot quickly change the hosting setting. Unfortunately, this is a lengthy process and you will need different helper plugins depending on your requirements.
6.1. Enable page caching for specific URLs
Follow the next step to enable WP Rocket page caching for only specific pages on your site.
- Go to GitHub and download the WP Rocket helper plugin for caching pages with exceptions .
- Unzip the archive file and edit the “wp-rocket-no-cache-with-exception-urls.php” file.
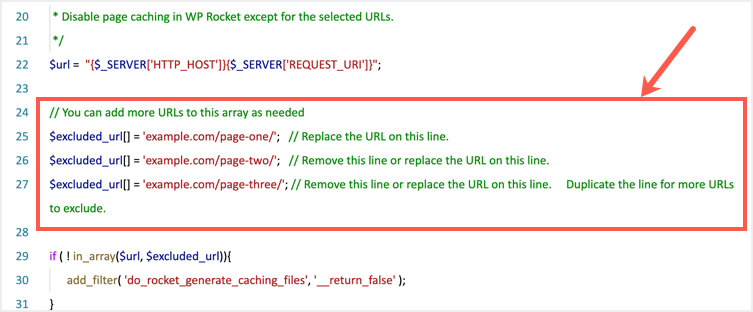
- They included three examples of include URLs from lines 24 to 27 in this file, as shown below. You can replace “example.com/page-one/” and the other two examples with your domain URL. You can add more lines between this block if needed.
- Save the file and zip it again as a ZIP folder along with the readme file.
- Go to your WordPress admin panel, upload the plugin and activate it like any other plugins on your site.
Now that WP Rocket won’t cache pages on the entire site except for the URLs listed in the helper plugin file.
6.2. Disable page caching only on specific pages
Instead of the above method, you can use an alternative helper plugin to disable page caching on specific pages only.
- You can download the helper plugin and edit the “wp-rocket-no-cache-for-page.php” file.
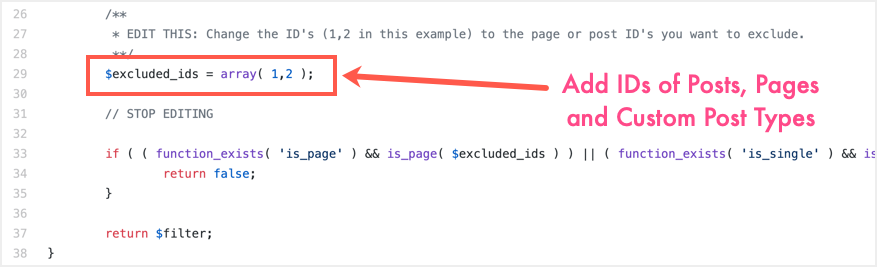
- In this case, you must enter the post or page IDs on line 29, replacing ID patterns 1, 2 in the file.
- Save the file and zip it again to upload to your site.
- Activate the plugin to disable page caching only for provided posts or page IDs.
6.3. Completely disable page caching
If you want to disable page caching on the entire site without exception, then use this helper plugin . You can simply download and activate it on your site without changing the contents of the plugin file.
6.4. Disable page caching for logged in users
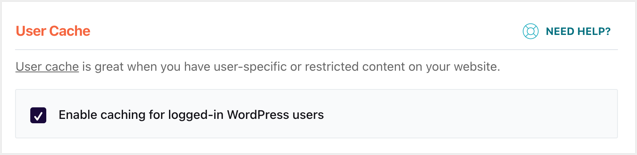
Both of the above methods disable page caching for regular users not logged into your site. However, WP Rocket also offers the feature of creating a separate cache for authorized users. You can enable this option under Cache > User Caching.
If you want to disable page caching for logged in users, use this helper plugin . You don’t need to change the content, just download the zip file and activate the helper plugin. Remember that you need to use this plugin along with one of the above methods to disable page caching for both logged in and logged out users.
Things to remember
Generally, WP Rocket clears the cache whenever there is a change on your site. However, we recommend that you remove the following cached content before attempting to test pages again.
- Delete the browser cache by pressing “Control + Shift + Delete” on Windows and “Command + Shift + Delete” on macOS. This will open a delete browsing history popup from which you can delete previously cached files from your browser. However, this will log you out of the WordPress admin panel as the session cookie will expire. Therefore, first save all changes and log out before clearing the browser cache. The best option is to use an alternative browser for testing purposes so that you can test in parallel without having to log out.
- Remove caching from any other plugins if they are active on your site. As mentioned, all SiteGround sites come with the SG Optimizer plugin pre-installed. Therefore, it is necessary to clear the SG Optimizer cache before testing.
- Finally, clear server-level caching if it is active on your hosting server. This is the case with most hosting companies that offer varnish or custom caching customization.
Final words
As you can see, bypassing WP Rocket caching on a WordPress site is a simple task by adding a parameter to your URL. You can also exclude individual pages from the plugin’s global settings or from the editor’s meta box. However, completely disabling page caching or on specific pages is a tricky task that requires a helper plugin. Make sure you choose the right method based on your needs to get the right results.